2011年11月30日星期三

Newly-upgraded Aiseesoft DVD Ripper - Speed up Conversion

Nowadays, with the appearance of video converters, you can enjoy your favorite videos, including DVDs with DVD Ripper products on multiple players, such as PSP, iPod, iPhone, iPad (iPad 2), Zune, BlackBerry, Creative Zen, Apple TV, Xbox, NDS, Mobile Phone, etc. However, there is another annoying problem – it can take a long time to convert a video to your preferable format. In order to solve this problem, Aiseesoft upgraded the DVD Ripper software recently. Now, this Best DVD Ripper can bring much faster converting speed with AMD APP and NVIDIA® CUDA™ GPU Processing acceleration technology.
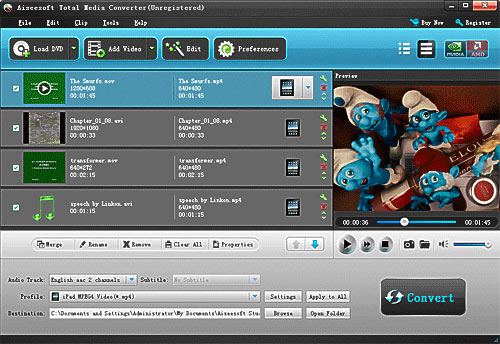
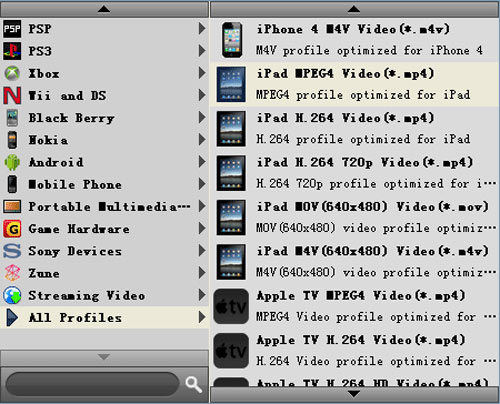
With these two technologies, Aiseesoft DVD Ripper can easily rip DVD to MP4, H.264, AVI, WMV, FLV, MKV, 3GP, VOB, DivX, MOV, DPG, etc., even HD video, like HD H.264, HD AVI, HD MPG, HD TS, HD WMV, HD MPEG 4, HD MOV, HD ASF, etc. with best quality in a shorter time. This DVD Ripper can extract audio files from DVD movies. With this best DVD Ripper software, you can enjoy your DVD files on PSP, iPod, iPhone, iPad (iPad 2), Zune, BlackBerry, Creative Zen, Apple TV, Xbox, NDS, Mobile Phone, etc.
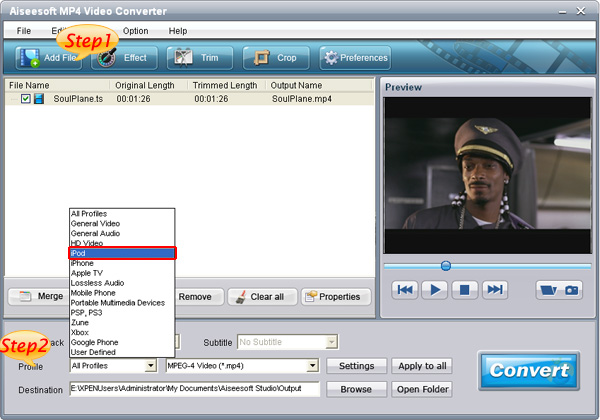
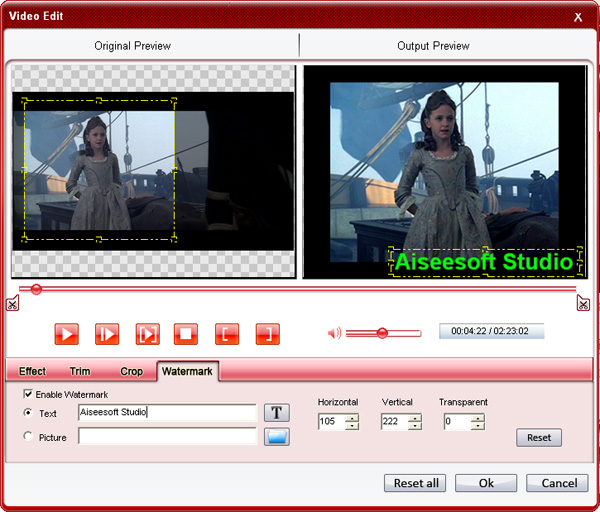
This professional DVD Ripper also possesses powerful movie editing functions, such as trimming video length, adjusting video brightness/saturation/contrast, watermarking video, cropping video size and joining video clips.
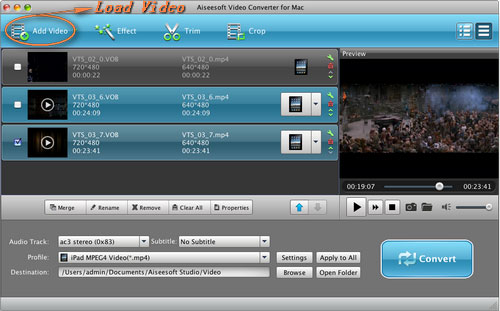
Taking into account Mac users, this DVD Ripper released Mac version - Aiseesoft DVD Ripper for Mac, which provides you with the fastest speed to rip DVD to AVI, MP4, MOV, FLV, WMV, DivX, XviD, HD MP4, TS video formats, and MP3, AAC, AC3 audio formats on Mac. It also has the same powerful editing functions as Windows DVD Ripper.
Price and Availability
Aiseesoft DVD Ripper is now priced at $ 35.00
For more information, you can visit:


System Requirements
OS Supported: Windows NT4/2000/2003/XP and Windows Vista, Windows 7
Hardware Requirements: 800MHz Intel or AMD CPU, or above; 512MB RAM or more

2011年11月28日星期一

Mac/Windows MP4 Converter Guide: how to convert video to MP4 format?

MP4 video format is a very popular video format right now. Actually, MP4 file is multimedia file, which is a container format that can store video, audio and subtitle data. MP4 format is really popular because many stores like iTunes are using this container format, iPod and Playstation Portable (PSP) and other popular devices support MP4 format.
This guide aims to show you how to convert videos to MP4 format on Windows and Mac.

For Windows:
To convert videos to MP4 format I use Aiseesoft MP4 Video Converter.

Its input video formats are really amazing.
It can decode MPG, MPEG, MPEG2, VOB, MP4, M4V, RM, RMVB, WMV, ASF, QT, TS, MKV, AVI, 3GP, FLV, MPV, MOD, TOD, MP3, MP2, AAC, AC3, WAV, MID, MIDI, WMA, M4A, RA, RAM, HD video etc. and convert them into MP4 format.

It works perfectly with iPod iPhone, PSP, Creative Zen, Zune, Zune 2, iRiver PMP, Archos, PS3, Xbox, etc.

Step 1: Load Video
Click “Add File” to load the video that you want to convert to MP4 format to Aiseesoft MP4 Video Converter.
You can also do it by clicking “File” and choose “Add File”.


Step 2: Choose Your Output Profile and Settings
From “Profile” drop-down list you can choose your output profile according to your need.
For example, if you have a iPod and you want to convert video for it, you need to choose “iPod” from the profile list and then it also provides the second chance to specify your iPod generation. You can choose “iPod touch”, “iPod nano” and other iPod generation.

You can also adjust the settings of your output video, such as “video/audio encoder”, “Video/audio Bitrate”, “Channels”, “Resolution” and so on.

Step 3: Video Editing
This powerful MP4 video converter allows you to do many video editings.

1. Effect:
You can adjust the “Brightness”, “Contrast”, “Saturation” and also you can use “deinterlacing” to improve you output effect.

2. Trim:
“Trim” function allows you to pick up any part of your video to convert. You can just convert a part of your video that you want.
There are 3 ways that you can trim your video.
a. You can drag the buttons to set the start and end time
b. You can preview the video first and when you want to start trim click the left one of the pair buttons when you want to end click the right one.
c. You can set the exact start and end time at the buttom of the pop-up window.

3: Crop:
“Crop” means to choose a certain play area to convert.
There are 2 ways that you can crop your video.
a. You can set your own mode on the bottom of the pop-up window
b. You can drag frame to set your own crop mode

Step 4: Conversion
After you have done all the steps above you can click “Start” button to start your conversion.

For Mac:
Mac users can also enjoy Mp4 video at will.
Here you just need Aiseesoft MP4 Video Converter for Mac.

Step 1. Load Video
Click “Add File” to load the video/movie that you want to convert to MP4 format.

Step 2. Choose Profile and Settings
You can choose your output profile on a drop-down list.
Click “Settings” button you can adjust the details of your output video/movie

Step 3. Conversion
Everything is ready and you just need to click “Start” button to begin the conversion.

2011年11月27日星期日

Best iPad Converter Reviews

All of us who have got iPad are looking for best and easy converter programs with the enjoyment of iPad miracle. In this way it will become more convenient to enjoy music, movie video and ebook, etc.. I found several programs that are really easy to use.
No. 1 iPad Converter Suite
iPad Converter Suite is the first choice for all because it can rip DVD, convert video to iPad and transfer files from iPad to computer. Only program can do almost all things.


No. 2 Free iPad Video Converter
iPad Video Converter is a wonderful simple and easy iPad video converter. It can convert almost all video formats to iPad which lets you enjoy watching any video on your iPad anywhere and anytime.

No. 3 DVD to iPad Converter
DVD to iPad Converter is mainly to rip DVD for iPad to MPEG, MP4, AVI, WMV, RM, DivX etc..
In addition, these programs above are good video editor. They can trim, crop and add watermark to video. All are so easy to meet your requirement.

2011年11月24日星期四

How to Convert DVD and Video to Any Video Format You Want Freely

Convert DVD and video is really easy for most of people now. You just need a DVD converter and a video converter. Use dvd converter to convert your DVD and use video converter to convert video. Do you want only one converter that can help you to convert both DVD and video in one interface with few clicks and high output quality. Today I will introduce you a Total Media Converter that convert both DVD and video.

You need to download and install it first before you can use it.

Step 1: Load DVD/Video
Click “Add File” to load Videos from your computer
Click “Load DVD” to load your DVD from your DVD Drive


Step 2: Choose Output Info
a. Convert video:
Choose output profile first in the drop-down list and then click “settings” button to adjust the specific settings, such as “resolution”, “encoder”, “bit rate”, “frame rate” and some audio settings such as “audio encoder”, “sample rate” and so on. You can save your profile and settings and give it a name, so you can use it next time easily.


b. Convert DVD
Choose output profile first and then you need to choose your output audio track and subtitle, if you do not want them you can leave them blank. Also like convert video you can adjust the specific output settings, such as “resolution”, “bit rate” and so on.
Save the profile and settings for next use is also available.

Step 3: Conversion
Click “Convert” button to start your conversion. You will get your output video soon.

Tips:

1. Adjust the output effect
You are allowed to adjust the “Brightness”, “Contrast” and “Saturation” of the output video. “Deinterlacing” is also available to improve the quality of the output video. You can choose “apply to all” to save your time.

2. Pick up a part to convert
If you do not want to convert the whole video or DVD you can just pick up the part that you want to convert using “Trim” function.
You can do it in 3 ways:
a: Enter the start time in the Start Time box and click OK, then enter the end time in the Set End Time box and click OK.
b: Drag the scissors bars under the preview window when you want to trim, then the time will be shown in the Start Time box and End Time box for your reference.
c: While playing video, click “Trim From” button where you want to begin your trimming and click “Trim To” button where you want to stop your trimming.

3. Crop the output video
This powerful video converter allows you to crop the video play area. You can choose a certain play area to convert, and do snapshot.
You can crop your output video in 2 ways:
a: Crop by adjusting the crop frame
The crop frame is the yellow line around the movie video. There are eight small adjustment boxes on the crop frame. Each adjustment box allows you to crop the movie video from a different position. To crop your movie video, you can just move your mouse cursor to an adjustment box and drag the crop frame.
b: Crop by setting the crop values
There are four crop values on the buttom of the window: Left, Top, Right, Bottom. You can set each value to crop your movie video, and the crop frame will move accordingly.

You can also set the output aspect ratio from the Zoom Mode according to your need. There are four choices available: Keep Original, Full Screen, 16:9 and 4:3.

4. Add watermark to the output video
You can add text and picture watermark to your output video easily with Aiseesoft Total Media Converter.
Check the “Enable Watermark” box and choose “Text” or “Picture” as you want.
You can drag the watermark to find the place you want to put and also you can adjust the Font info of the words you from “T” button.

2011年11月23日星期三

DVD to iPad Converter Assist You to Enjoy DVD on iPad Freely!

With the appearance of the iPad, many types of video converters for iPad, like iPad video converter and iPad transfer have sprung up. Have you ever tried one of them? Whether or not, it is definite that these tools are surely useful to convert general video to iPad compatible formats. However, if you find a wonderful DVD video and want to watch it on your iPad while iPad can't play it directly, what should you do? Aiseesoft DVD to iPad Converter is specially designed to convert DVD files to iPad.
DVD to iPad Converter, the best and most powerful DVD to iPad converter, is able to rip any DVD file to almost all popular video formats including MPEG-4, H.264/MPEG-4 AVC, MOV, and M4V supported by iPad. In addition, this versatile software allows you to extract audio formats, such as AAC, MP3, WAV, AIFF, M4A, from DVD file.
In addition, this DVD to iPad Converter also brings you rich editing functions. You can trim video length, crop video play region, set video parameters, add watermark, etc. Moreover, you can choose your preferable audio track and subtitles or get some lovely pictures using the snapshot function. Also, you can merge several DVD pieces together and output them in a single file.
Furthermore, Aiseesoft DVD to iPad Converter for Mac plays the same role for Mac users. With DVD to iPad Converter software on hand, you can enjoy your favorite DVD video not only on your DVD player but also with your iPad conveniently. In a word, this DVD to iPad Converter should be your best choice when you want to enjoy your DVD movies in most efficient way.
Price and Availability
DVD to iPad Converter is now priced at $ 29.00

System Requirements
OS: Windows NT4/2000/2003/XP, Windows Vista and Windows 7
Requirements: 800MHz Intel or AMD CPU, or above; 512MB RAM or more

2011年11月22日星期二

How to Put DVD/Video on iPod, PSP, Computer, Zune, Xbox (Mac/Windows)

Many Mac users have iPod, PSP and other portable devices, but they can only enjoy songs and videos from iTunes or buy them from internet, because there is seldom nice Mac DVD and Video covnerter for iPod, PSP and other devices. Today I will introduce you an excellent DVD/Video converter for Mac: Aiseesoft DVD Converter for Mac It allows you to put your own DVDs and you own videos on your iPod, PSP, Mac Computer and other players on Mac.

This article aims to show you how to put your DVDs and videos on your iPod, PSP, Computer, Zune, Xbox and other players for Mac users.

Part 1. Convert DVD for Mac with Aiseesoft DVD Ripper for Mac

Step 1. Load DVD
Insert DVD into your DVD-ROM, run DVD Ripper for Mac, click “Load DVD”, find the DVD folder of the movie you want to add from your DVD-ROM, and Click “Open”.

Step 2. Set output format.
This best DVD ripper for Mac provides you output formats as many as you want. Just choose one from the drop down list “profile” according to your portable player.

If you are very professional with your player, you can also set your output parameter values such as Resolution, Frame Rate, Bitrate and Sample Rate and so on.

Tips:
1. Trim:

If you want to rip only a part of the DVD movie, please click “Trim” button and drag the “Start trim slider” to set the start time and “End trim slider” to set the end time. (a). You can also do that by clicking the “Start trim button” and “End trim button”(b). The third way you do that is set the exact Start/End time at the right of the pop-up window and click “OK”.

2. Crop:
If you want to remove the black edges or you want to rip a certain area of your video, please click the “Crop” button. You can do this either by drag the frame around the movie (a) or set the crop value: “Top, Left, Bottom, Right”.(b). Another way to do that is choose mode from “Crop Mode”(c).DVD Ripper for Mac also allows you to choose the output aspect ratio above the crop panel, “Keep Original, full screen, 16:9 and 4:3” are available.

3. Effect:
If you want to adjust the effect of your movie, please click the “Effect” button and a pop-up effect window will appear. It allows you to edit your movie’s effect including “Brightness, Contrast, Hue, Saturation and Volume”.

Click “Start” to begin your conversion.

Part 2. Convert videos for Mac with Aiseesoft Video Converter for Mac

Step 1. Choose “Video Converter for Mac” on the main interface.

Step 2. Add video
Click “Add File” to load your video that you want to put.
Step 3. Choose output profile and settings.
You can choose your output format from the drop down list and you can set the exact values of your output videos, such as Resolution, Frame Rate and so on.

You can do the video editing as the same way of convert DVDs.
After getting your satisfying video, then click “Start” button to start your conversion.

If you are a window user, Aiseesoft DVD Converter is your best choice.
It is the perfect combination of Aiseesoft DVD Ripper, Aiseesoft Total Video Converter and Aiseesoft iPod to Computer Transfer. With this powerful DVD Converter Suite, you can easily convert DVD and video to all the popular formats: MP4, H.264, AVI, MP3, WMV, WMA, FLV, MKV, MPEG-1, MPEG-2, 3GP, 3GPP, VOB, DivX, Mov, RM, RMVB, M4A, AAC, WAV, etc
And transfer your iPod songs and videos to your computer easily.

2011年11月20日星期日

How to Enjoy Your Favorite Videos on Portable Devices at Will For Mac Users

Are you a Mac user? Do you still feel frustrated that you can’t enjoy your favorite videos on portable devices at will?
Now, a professional software—Aiseesoft
Video Converter for Mac
can help you to solve all the problems. With it, you can convert between all popular video and audio formats with super fast conversion speed and high output quality, such as AVI, MP4, MOV, MKV, WMV, DivX, XviD, MPEG-1/2, 3GP, 3G2, VOB Video, MP3, AAC, and AC3 Audio etc. In addition, the best video converter for Mac can also extract audio from video file and convert video to MP3, AC3, and AAC…as you want.

OK, let’s move to how to use the amazing software.

Step 0: Download and install Aiseesoft Video Converter for Mac.
After a while, you can use the following interface:


Step 2. Load Video
You can load your video by clicking “Add File” button or clicking “File” button, you can choose “add file” on a drop-down list.

Step 3. Output format and Settings
From the “Profile” drop-down list you can find one format that meets your requirement.

After doing the 3 steps above, you can click “start” button to start conversion.
Wait a minute, the conversion will be soon finished.

Tips:
1. Trim
"Trim" function is for you to select the clips you want to convert.
There are 3 ways that you can trim your video.
a. You can drag the buttons(1) to set the start and end time
b. You can preview the video first and when you want to start trim click the left one of the pair buttons(2) when you want to end click the right one.
c. You can set the exact start and end time on the right side of the pop-up window.
It is for you to select the clips you want to convert.

2. Crop
Cut off the black edges of the original movie video and watch in full screen using the "Crop" function.
There are 3 ways that you can crop your video.
a. We provide 7 modes on our “Crop Mode”(1)
b. You can set your own mode on the right side of the pop-up window(2)
c. You can drag frame to set your own crop mode(3)
You can cut off the black edges of the original movie video and watch in full screen using the "Crop" function.

3. Snapshot and merge into one file
If you like the current image of the video you can use the “Snapshot” option. Just click the “Snapshot” button the image will be saved and you can click the “Open” button next to “Snapshot” button to open your picture.
If you want to make several files output as one you can choose “Merge into one file”.

If you are windows users, you can go to Aiseesoft Total Video Converter to get more information.